Wednesday, April 20, 2011

Craft Warehouse - Pink Paislee, Daily Junque Gratitude Journal

GRINDER5.40 by craftwarehouse
GRINDER5.40, a photo by craftwarehouse on Flickr.


This mini book would be perfect for a gift or to use for yourself as a great way to store up your thoughts of thanksgiving. I removed the pages from the spiral binding and cut some pages short and printed a top ten list for each month as well as a gratitude quote. Each 2 page spread has been dedicated to a month (April-Dec 2011). This way, each week I can note a few things to be thankful for, include pictures, etc. There are hidden pockets throughout the book to tuck in special notes, journal entries, ticket stubs, lists, etc. One of my favorite techniques is to hide my journaling in pockets. I use a circle punch and punch out a half circle to reveal the hidden pocket. Half circles along the edge of a page works perfectly for holding twine in place too! I used clothespins on some of my hidden notes so they are easy to pull out. I also used parchment paper throughout the book.  I used Microsoft Word and set the page/paper size the same as the pages I cut down (I think the pages are 4.5 x 6). I was sure to set the margins to .3" and the left margin to .5" on the pages with the month/list so the numbers weren’t' t too close/hidden by the spiral.
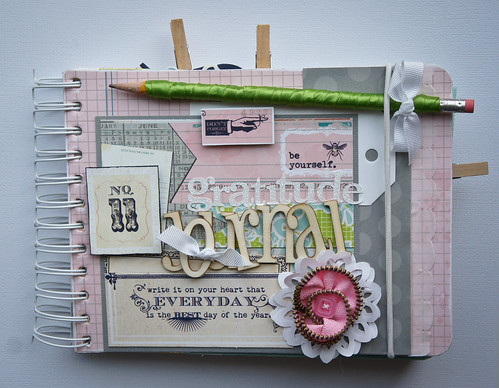
Front page

April

I used some Smartphone pictures, edited them in Photoshop and had them printed as mini wallets at Costco. 
These little pictures are fun to work with in a mini album!

A hidden pocket on April's page. 

What happened to Jan-Mar?  I wanted my design team project to give people an idea for a great gift - a journal like this can be made anytime of the year!  Let the first page be the current month and either make the journal go through to the end of the year or maybe your book can go for 12 months.  Options are endless!
May


June


July


August


September

"Gratitude is riches.  Complaint is poverty." - Doris Day

October

November

December has lots of pockets to tuck notes and pictures!

The last 3 pages are left for some quotes and sayings. 


Craft Warehouse - Pink Paislee Hometown Summer & We R Memory Keepers Sew Easy #2

  by dailygrinddesigns
, a photo by dailygrinddesigns on Flickr.

I had so much fun with this layout...once I started.  These pictures worked perfectly with the bright bold reds and yellows and even though these pictures were taken last fall they remind me of the last few hot summer days left before the flowers disappear again until spring. 

One little trick I love to use on my pages is taking my small circle punch and punching a half circle on the edge to hold my twine in place.  I used to use this technique all of the time and had forgotten about it!  I love rediscovering these things that just add a bit to a page.


 I cut up some sticker borders to create this custom banner.


Craft Warehouse - Pink Paislee Hometown Summer & We R Memory Keepers Sew Easy

  by dailygrinddesigns
, a photo by dailygrinddesigns on Flickr.

Pink Paislee's Hometown Summer line is bright and cheerful.  I think the papers would be perfect for card making or for any scrapbook layout!  This layout was made to fit into a shadow box 12x12 frame.  I have been wanting to make mu own custom "photobooth" pictures and I used my SmartPhone to take these self portraits. 


 I took my time hand stitching the We R Memory Keepers Sew Easy Star Burst.  I watched a couple of episodes of NCIS Los Angeles and finished with a bit of BBC Top Gear.  The "Faith, *heart*, and Hope was printed out onto some Hometown Summer patterned paper using my computer and then hand stitched over top. I don't sew and  this trick helped hide the imperfect stitches with the black ink underneath!  It worked as a good guide/template too!


"Faith and love are inseparable housemates that offer hospitality to hope."  Beth Moore, Believing God

Life is Beautiful Card

Life is Beautiful 002 by dailygrinddesigns
Life is Beautiful 002, a photo by dailygrinddesigns on Flickr.

I have been working on some fun projects (pictures to come soon) and I am surprised I haven't updated my blog for awhile now.  There are days I just like to play with some new papers purchased or I'll just try a new technique.  Somethimes I see a color combo and it inspires me to create.  This was a card I made because the colors excited me.  The rich yellow and reds...and the vintage look!  Love!


I am really happy with how my pictures are turning out using my Sony NEX3.  I have to admit that I bounce from the special programed settings (it has the coolest Maro Setting) and Manual.  Then, Jen taught me how to use Lightroom and I am becoming more and more comfortable editing my own photographs.  Jen has posted some really good advice on "Taking Better Photos" on the Craft Warehouse forum.  She also taught a class at the Salem CW store and it was amazing!  I learned a lot!  Check it out!  It looks like she is going to post some advice every now and then!

Friday, February 25, 2011

Friends, Love, & Faith Blog Hop

Don't miss the fun being had this weekend during the Paper Tree House Studio's Friends, Love, & Faith Blog Hop. 

Create Well Create Often is one stop along the way...

http://createoften.blogspot.com/2011/02/friends-love-and-faith-blog-hop.html

I want to share a few cards I completed in the past few weeks.  I usually make cards in bulk in order to give them away as gifts (at least 3-6 the same).  Although I enjoy making a bunch of cards and giving them away in pretty sets, I sure get bored.  I picked up a few new stamps as gifts and on sale and I was itching to use them.  I used my stash and just had a blast! 


Friday, February 11, 2011

Craft Warehouse: Tim Holtz Configurations with K&Co

I just can't get enough of K and Company's Flora Fauna!  I have what I call a birds and nest fetish.  My home is decorated here and there with them.  This line is filled with things I adore.  Vintage, eggs, birds, butterflies, newsprint, a natural botanical look...


Birds and Butterflies Shadow Box by Rebecca Grinder

Tim's configuration boxes come with endless possibilities.  So, this challenge spurred my imagination in so many directions!  I had to tame my ideas to a handful of techniques so the project wouldn't look wild!  I painted my configuration black.  Once dry I added Ranger's Rock Candy and then filled the cracks with some silver paint in spots.


The chipboard letters and elements are classy and the chipboard butterfly bent perfectly.  I added a bit of Stickles for some shimmer and shine.  I loved the typewriter key stickers.  The one above says "Wonder".
 

I tied some broken twigs together with some twine and broke off one of K&Co's straight pins for the decorative tip.  It was easy to use wire to help steady my bird exactly where I wanted him.
 

One of my favorite techniques I wanted to accomplish in my design was to create a variety of layers.  Each of my configuration boxes has different depths.  The above box is layers of chipboard and cardboard almost an inch thick.  Using my craft knife, I created a shadow box.  The plastic packaging from K&Co's chipboard letters worked perfectly for the acetate to hold my pinned butterfly and glitter.  I had so many layers of cardboard, I needed a hammer to put my pins in place! 

I separated a typewriter key epoxy sticker to set a picture of my husband and I, taken on our honeymoon, under the layers of the sticker. 


I wanted the butterflies to look like they were in flight so I have each one attached to some coiled wire.  I coated each sticker with some Glossy Accents so they would be easier to dust and stay clean.
 

I used packaging foam for some of my boxes and layers.  I found the foam used for packaging brads worked the best.  I coated the foam using an Embellishment Glue Stick and covered it with paper.


I wrapped some twine around a chipboard letter "H" and layered some buttons together with wire.  I filled the boxes with some things around the house like a clothespin, thimble, a teabag, a paper measuring tape, buttons...


My favorite part of this challenge was creating a drawer using cardboard.  I decoupaged pieces of a paper bag to the cardboard to help keep the drawer stay firm.  Then, once dry and painted black, I covered the outside of the drawer with patterned paper.  I let some K&Co fabric flowers flow out of the box along with a feather.

This project was one of my favorites and can be seen in person displayed at the Salem Craft Warehouse.  Be sure to check out all of the Design Team's spin on this assignment by going to their galleries here!  Check them out!

Monday, January 24, 2011

Plowing A Straight Line

Usually, I am scrapbooking pages all of the time.  Whether it is a project for Craft Warehouse or making cards for gifts, I am usually working on something.  This past month, I have been distracted.  I have always wanted to do some quilting and so I put my paper and pictures away for a bit to try my hand at it.  While doing so, I learned a good lesson.  Most things in life are learned best from a teacher.  I often times try to do things on my own accord and pat myself on the back for how well I think it is going.  But really, in the end, the result equals to crooked lines and uneven borders.

On Sunday, Pastor Erickson told a story about a farmer and his three sons.  The farm was to be left to the son who could plow the straightest line.  The eldest son kept looking over his shoulder at his brothers to check their progress and in doing so, his plow veered to the left and the right.   The middle son’s plow started to rattle and his horse was showing signs of problems which caused him to look down and worry about his circumstances.  His plow began to veer off course.  The youngest son instead, looked straight ahead, keeping the view of his father  (who was standing at the other end of the field) right in front of him.  In keeping his focus on the Father, he plowed the straightest line and won the farm.

I think I can do it on my own but it’s often when I hit rock bottom I reach out and up.  I have been listening to Matthew West's CD, The Story of Your Life and his song "Strong Enough" has really spoken some truth into my life.  Link on over and check it out.

So here are some of my most recent paper projects...


DSC01100-2.jpg

Fancy by Rebecca Grinder
Made for CW Scrap Club
Loved using some lace I got from a dear friend.

DSC01102-2.jpg

I love to make card set for gifts.  This was a card that was gifted back to me.  I was so happy to get it for my birthday card last year.  It was one of my favorite designs - one  I never took a picture of.  I thought I would add it to this page so it would stay safe in an album and it worked perfectly with this design.  I added my title right on top of the card.

DSC01104-2.jpg

DSC01105-2.jpg

So In Love, Seattle You and Me by Rebecca Grinder


DSC01107-2.jpg


DSC01109-2.jpg

My favorite part of making this layout was eating the Hershey's Kiss for the wrapper.


DSC01114-2.jpg

DSC01112-2.jpg